google chrome && Edge 插件
群晖note station 导入到joplin
使用notestation-to-joplin
参考readme,简单步骤如下
- 从note station 导出笔记,后缀为nsx
- joplin 开启网络抓取,填写token
- 克隆notestation-to-joplin,填写相关参数,执行导入
导入速度比较慢……
过程中碰到一些问题,记录一下
- pip install joplin-api失败
解决办法:
git clone  https://gitlab.com/annyong/joplin-api
cd joplin-api
pip install -e .- 执行脚本时,RuntimeError: Event Loop is closed
参考https://github.com/encode/httpx/issues/914
asyncio 和python之间不同步的问题
解决办法:
替换asyncio.run为trio.run
同时把
或者Running asyncio.get_event_loop().run_until_complete(...) instead of asyncio.run(...) - 导入后,笔记中的图标异常
修改notestation-to-joplin的导入代码
修改后的版本
宝塔面板ssl启用后网站无法访问
宝塔面板ssl启用后网站无法访问
https://www.54rj.com/index.php/2021/09/10/宝塔面板开启ssl后-https无法访问解决办法/
查看本机防火墙状态命令 firewall-cmd --state,显示running
查看已经打开的端口命令:firewall-cmd --list-all ,ports中并没有443
打开443端口:firewall-cmd --add-port=443/tcp --permanent ,
提示Warning: ALREADY_ENABLED: 443:tcp,success
然后reload一下:firewall-cmd --reload
再次查看已经打开的端口:firewall-cmd --list-all ,ports中已经有443端口了
java cron表达式
java cron表达式
https://docs.oracle.com/cd/E12058_01/doc/doc.1014/e12030/cron_expressions.htm
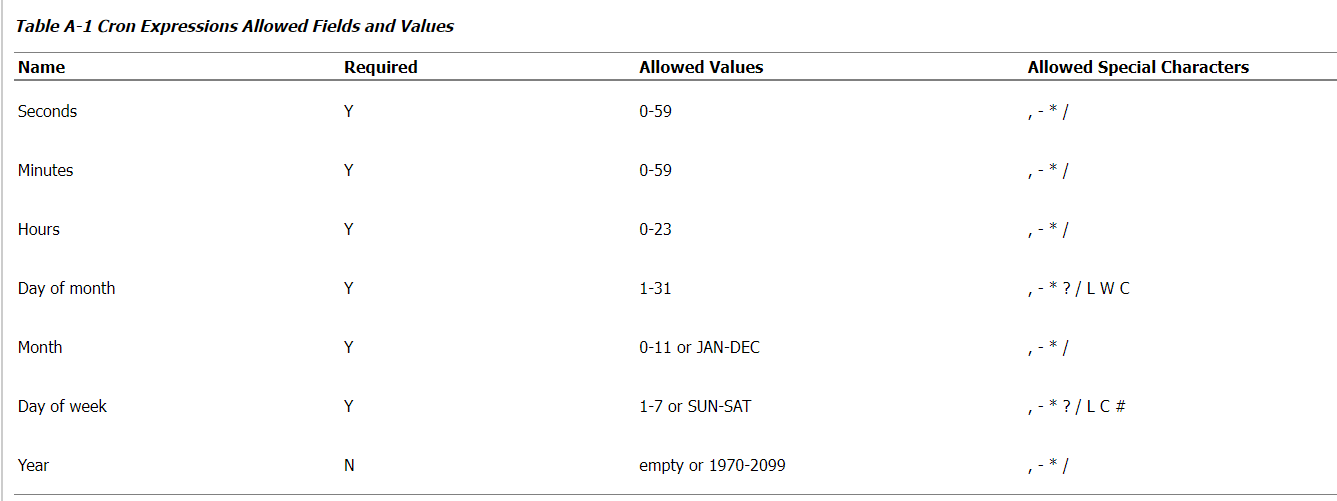
长度7位
秒分时日月星期年
Spring定时任务
# 每月的最后1天
@Scheduled(cron = "0 0 18 28–31 * ?")
public void doAtLastDayOfMonth() {
    final Calendar calendar = Calendar.getInstance();
    if (c.get(Calendar.DATE) == c.getActualMaximum(Calendar.DATE)) {
        // do something here...
    }
}
说明:
Java(Spring)
*    *    *    *    *    *    *
-    -    -    -    -    -    -
|    |    |    |    |    |    |
|    |    |    |    |    |    + year [optional]
|    |    |    |    |    +----- day of week (0 - 7) (Sunday=0 or 7)
|    |    |    |    +---------- month (1 - 12)
|    |    |    +--------------- day of month (1 - 31)
|    |    +-------------------- hour (0 - 23)
|    +------------------------- min (0 - 59)
+------------------------------ second (0 - 59)
长度6位,去掉最后的年
Springboot +log4j2
1. 屏蔽所有log4j
<dependency>
    <groupId>org.springframework.boot</groupId>
    <artifactId>spring-boot-starter-logging</artifactId>
    <exclusions>
        <exclusion>
            <groupId>*</groupId>
            <artifactId>*</artifactId>
        </exclusion>
    </exclusions>
</dependency>
<dependency>
    <groupId>org.springframework.boot</groupId>
    <artifactId>spring-boot-starter-log4j2</artifactId>
</dependency>
2. IDEA 调试时,记得清空target目录下,因为有缓存,尝试了很多次都是有问题,清空后即可。
参考:
log4j-slf4j-impl cannot be present with log4j-to-slf4j_草原孤狼的专栏-CSDN博客
gitlab 备份与恢复
gitlab 安装于黑群晖,是群晖自有版本。
第一次升级手动下载12.10.6,安装失败,提示redis下载失败显示已经安装了12.10.6,需要修复
卸载群晖gitlab,直接搜索安装docker版的gitlab ce 11.11.8
安装还算顺利,配置目录映射和端口,其他基本没动
然后开bash,进入终端,rake gitlab:backup:restore RAILS_ENV=production BACKUP=1625992100_2021_07_11_11.11.8一直报错,找不到rakefile
搜索了一下,才发现应该使用gitlab-rake恢复OK
gitlab-ctl reconfiguregitlab-ctl restart
- 还是报500错误,无法登录
log中发现:{ "method": "POST", "path": "/users/sign_in", "format": "html", "controller": "SessionsController", "action": "create", "status": 500, "error": "ActiveRecord::NotNullViolation: PG::NotNullViolation: ERROR: null value in column \"id\" violates not-null constraint\nDETAIL: Failing row contains (null, 2, SecurityEvent, 2, User, ---\n:with: standard\n:target_id: 2\n:target_type: User\n:target_det..., 2021-07-12 03:52:35.682732, 2021-07-12 03:52:35.682732).\n: INSERT INTO \"audit_events\" (\"author_id\", \"type\", \"entity_id\", \"entity_type\", \"details\", \"created_at\", \"updated_at\") VALUES (2, 'SecurityEvent', 2, 'User', '---\n:with: standard\n:target_id: 2\n:target_type: User\n:target_details: mingyang wu\n', '2021-07-12 03:52:35.682732', '2021-07-12 03:52:35.682732') RETURNING \"id\"", "duration": 2954.65, "view": 0.0, "db": 158.04, "time": "2021-07-12T03:52:32.741Z", "params": [ { "key": "utf8", "value": "✓" }, { "key": "authenticity_token", "value": "[FILTERED]" }, { "key": "user", "value": { "login": "minyoad@gmail.com", "password": "[FILTERED]", "remember_me": "0" } } ], "remote_ip": "59.60.10.194", "user_id": 2, "username": "wmingyang", "ua": "Mozilla/5.0 (Windows NT 10.0; Win64; x64) AppleWebKit/537.36 (KHTML, like Gecko) Chrome/91.0.4472.124 Safari/537.36 Edg/91.0.864.64", "queue_duration": 13.01, "correlation_id": "zBrUR6Nkap5"}
audit_events 的sequence 丢失解决办法:
gitlab-rails dbconsole
create SEQUENCE audit_events_id_seq OWNED BY audit_events.id;ALTER TABLE ONLY audit_events ALTER COLUMN id SET DEFAULT nextval('audit_events_id_seq'::regclass);
- merge request 500
"error": "ActiveRecord::NotNullViolation: PG::NotNullViolation: ERROR: null value in column \"id\" violates not-null constraint\nDETAIL: Failing row contains (null, 2, 79).\n: INSERT INTO \"merge_request_assignees\" (\"user_id\", \"merge_request_id\") VALUES (2, 79) RETURNING \"id\"",
create SEQUENCE merge_request_assignees_id_seq OWNED BY merge_request_assignees.id;ALTER TABLE ONLY merge_request_assignees ALTER COLUMN id SET DEFAULT nextval('merge_request_assignees_id_seq'::regclass);
SELECT setval('merge_request_assignees_id_seq', 62, true); "error": "ActiveRecord::NotNullViolation: PG::NotNullViolation: ERROR: null value in column \"id\" violates not-null constraint\nDETAIL: Failing row contains (null, empty, 80, 2021-07-16 16:49:45.504076, 2021-07-16 16:49:45.504076, null, null, null, null, null, diff-, null, null).\n: INSERT INTO \"merge_request_diffs\" (\"state\", \"merge_request_id\", \"created_at\", \"updated_at\", \"external_diff\") VALUES ('empty', 80, '2021-07-16 16:49:45.504076', '2021-07-16 16:49:45.504076', 'diff-') RETURNING \"id\"", create SEQUENCE merge_request_diffs_id_seq OWNED BY merge_request_diffs.id;ALTER TABLE ONLY merge_request_diffs ALTER COLUMN id SET DEFAULT nextval('merge_request_diffs_id_seq'::regclass);SELECT setval('merge_request_diffs_id_seq', (select max(id) from merge_request_diffs), true);
参考:gitlab迁移及迁移后500问题 - SegmentFault 思否
Update migration procedure (#2827) · Issues · GitLab.org / GitLab FOSS · GitLab
- docker版
进入bash,bin目录下
rake gitlab:backup:create RAILS_ENV=production
# 你会找到一个类似 /home/git/data/backups/1531046569_2018_07_14_10.6.4_gitlab_backup.tar 的文件
rake gitlab:backup:restore RAILS_ENV=production BACKUP=1625992100_2021_07_11_11.11.8
参考:
GitLab升级维护及升级后报500错误_周二也被占用-CSDN博客
- 外部URL设置
external_url 'https://gitlab.example.com:9443'
nginx['listen_port'] = 80 #如果不设置,默认与external_url的端口一致nginx['listen_https'] = false
参考:GitLab on Synology: set ‘external_url’ – mixable Blog
- merge request 500错误
postgresql - Postgres manually alter sequence - Stack OverflowSELECT 'SELECT SETVAL(' || quote_literal(quote_ident(PGT.schemaname) || '.' || quote_ident(S.relname)) || ', COALESCE(MAX(' ||quote_ident(C.attname)|| '), 1) ) FROM ' || quote_ident(PGT.schemaname)|| '.'||quote_ident(T.relname)|| ';' FROM pg_class AS S, pg_depend AS D, pg_class AS T, pg_attribute AS C, pg_tables AS PGT WHERE S.relkind = 'S' AND S.oid = D.objid AND D.refobjid = T.oid AND D.refobjid = C.attrelid AND D.refobjsubid = C.attnum AND T.relname = PGT.tablename ORDER BY S.relname;
升级到12.0.12
docker升级后,ci-cd配置的500 错误竟然消失了再次升级后,cicd 500 问题依旧参考:Project CI/CD-Settings broken - How to Use GitLab - GitLab ForumGitLab 迁移之后的事情 - 苏洋博客 (soulteary.com)
works fine without restarting or reconfiguring gitlabhq_production=> update Projects set runners_token_encrypted = null;全部设置为null即可。
问题原因
再次查看备份与恢复 的文档,发现 GitLab 在恢复备份过程中,对于下面的文件是不会进行备份和恢复操作的。 /etc/gitlab/gitlab-secrets.json /etc/gitlab/gitlab.rb /home/git/gitlab/config/secrets.yml
而被恢复的数据库中包含双因子加密验证的数据,其中的一个解密因子被保存在了 gitlab-secrets.json 中,如果你不进行手动合并操作,那么你的新 GitLab 应用中涉及到需要双因子解密的数据将都不可用,而 GitLab 在代码中也没有对这类情况作一些额外操作,就导致页面报 500 错误,显示不可访问。
升级路径
11.11.8 -> 12.0.12 -> 12.1.17 -> 12.10.14 -> 13.0.14 -> 13.1.11 -> latest 13.12.Z -> latest 14.0.Z -> 14.1.Z -> latest 14.Y.Z经过了几天的折腾,终于到了13.12了,真是不容易啊
eclipse 调试时出现label job 异常
某一天,eclipse升级到2020-09后,在eclipse调试时,总是弹出错误框,显示
An internal error occurred during: "Label Job"
怀疑新版本异常,使用2020-06, 发觉也会异常,暂时没时间折腾就放下啦。
今天再次研究,
查看workspace 目录下的log
!MESSAGE An internal error occurred during: "Label Job".
!STACK 0
java.lang.IllegalArgumentException
at org.objectweb.shadedzt.asm.signature.SignatureReader.parseType(SignatureReader.java:249)
at org.objectweb.shadedzt.asm.signature.SignatureReader.acceptType(SignatureReader.java:140)
at org.objectweb.shadedzt.asm.commons.Remapper.mapSignature(Remapper.java:207)
at com.zeroturnaround.jdi.util.TypeUtil.fixGenericSig(TypeUtil.java:40)
at com.zeroturnaround.jdi.JRReferenceType.genericSignature(JRReferenceType.java:374)
at org.eclipse.jdi.internal.ClassTypeImpl$$$jr.genericSignature(<generated>:60000)
at org.eclipse.jdt.internal.debug.core.model.JDIReferenceType.getGenericName(JDIReferenceType.java:297)
at org.eclipse.jdt.internal.debug.core.model.JDIObjectValue.getReferenceTypeName(JDIObjectValue.java:507)
at org.eclipse.jdt.internal.debug.ui.JDIModelPresentation.getValueText(JDIModelPresentation.java:471)
at org.eclipse.jdt.internal.debug.ui.JDIModelPresentation.getFormattedValueText(JDIModelPresentation.java:1357)
at org.eclipse.jdt.internal.debug.ui.variables.JavaVariableLabelProvider.getValueText(JavaVariableLabelProvider.java:86)
at org.eclipse.debug.internal.ui.model.elements.VariableLabelProvider.getColumnText(VariableLabelProvider.java:104)
at org.eclipse.jdt.internal.debug.ui.variables.JavaVariableLabelProvider.getColumnText(JavaVariableLabelProvider.java:175)
at org.eclipse.debug.internal.ui.model.elements.VariableLabelProvider.getLabel(VariableLabelProvider.java:84)
at org.eclipse.jdt.internal.debug.ui.variables.JavaVariableLabelProvider.getLabel(JavaVariableLabelProvider.java:220)
at org.eclipse.debug.internal.ui.model.elements.ElementLabelProvider.getLabel(ElementLabelProvider.java:297)
at org.eclipse.debug.internal.ui.model.elements.ElementLabelProvider.retrieveLabel(ElementLabelProvider.java:200)
at org.eclipse.jdt.internal.debug.ui.variables.JavaVariableLabelProvider.retrieveLabel(JavaVariableLabelProvider.java:186)
at org.eclipse.debug.internal.ui.model.elements.ElementLabelProvider$LabelUpdater.run(ElementLabelProvider.java:147)
at org.eclipse.debug.internal.ui.model.elements.ElementLabelProvider$LabelJob.run(ElementLabelProvider.java:74)
at org.eclipse.core.internal.jobs.Worker.run(Worker.java:63)
google,大多数没有用
最后发现
568473 – Exception on Breakpoint "Label Job" (eclipse.org)
I got a reply from JRebel:
"Thank you for reporting the issue. Our developers are aware of the issue and we are working on fixing it"
好吧,确实是使用啦JRebel
刚好,eclipse弹出升级确认,JRebel 有更新
升级完成后,OK。
在虚函数里面使用spring的DI
参考:https://medium.com/@citizenACLV/use-springs-dependency-injection-in-java-abstract-class-2573c1b4c0d1

实现的子类使用@Component

Factory 使用@Service, 得到实例的时候,使用@Autowired, 而不使用new
这个是关键,不然,虚基类的autowired会一直null

spring的autowired,默认是singleton,即autowired得到的都是同一个对象,
如果要每次都create new,则使用ObjectFactory,getObject每次会创建新的对象。
public class SingletonObjectFactoryBean {
@Autowired
private ObjectFactory<PrototypeBean> prototypeBeanObjectFactory;
public PrototypeBean getPrototypeInstance() {
return prototypeBeanObjectFactory.getObject();
}
}
参考:https://www.baeldung.com/spring-inject-prototype-bean-into-singleton
echarts 显示整数时异常
一组数据,都是整数,使用line chart显示,加上datazoom
datazoom移动到部份区域时,出现显示的点的位置没有对齐坐标

移动到特殊时间时出现,看数据都是整数,看不出异常。
解决方案:
移除sampling 配置
series: [{
symbol: "emptyCircle",
symbolSize:4,
type: 'line',
data:xdata,
// sampling:'average',
// showAllSymbol:'auto',
}]
sampling 的作用,在数据笔记多的时候,无法完整显示所有数据的一个取值方式, 因为之前设置了average,所以会异常的出现不是整数的值。